The RXNT Help Center is your central resource for staying informed about all RXNT support tickets assigned to your organization. Through this portal, you can track the progress of your requests, receive timely updates, and ensure that any issues are addressed efficiently.
In addition to ticket management, the Help Center offers a comprehensive library of knowledge-based articles, guides, and instructional materials designed to help you make the most of our software. Whether you are seeking step-by-step tutorials, best practices, or troubleshooting tips, this portal provides the resources you need to optimize your experience with RXNT.
Create an account
If you have never accessed the RXNT Help Center before, you will need to create an account. To do this, visit help.rxnt.com and click the New to RXNT Help Center? Sign up link.
Enter your full name and email address in the designated fields. Make sure the information is accurate, as it will be used to identify your account and communicate important updates regarding your RXNT Help Center access and support requests. Then, click Sign Up.
Enter your full name and email address in the designated fields. Make sure the information is accurate, as it will be used to identify your account and communicate important updates regarding your RXNT Help Center access and support requests. Then, click Sign Up.
After signing up, an email will be sent to the address you provided. This email will contain instructions to verify your account and complete the registration process, so be sure to check your inbox (and your spam or junk folder, just in case).
Open the email and click the Create a password hyperlink. This will guide you through setting a secure password for your RXNT Help Center account.
Enter your full name in the Your name field, then create a secure password that meets all requirements, including uppercase and lowercase letters, numbers, and special characters. Once complete, click Set Password to save your changes.
How to access the RXNT help center
To access the RXNT Help Center, visit help.rxnt.com and click Sign In.
Enter your email address and password, then click Sign In to gain full access to support tickets, knowledge-based articles, and Help Center features.
Enable two-factor authentication (2FA)
For added security, RXNT recommends enabling two-factor authentication (2FA) on your Help Center account. Two-factor authentication adds an extra layer of protection by requiring a verification code in addition to your password when signing in.
To turn on two-factor authentication:
-
Click your profile icon in the upper-right corner of any Help Center page, then click Profile to display your profile.
-
Click Edit Profile.
-
Select Manage 2FA.

-
Click Set up 2FA. A dialog box will appear prompting you to choose your preferred method for receiving passcodes (such as email or an authenticator app). Select your preferred method and follow the on-screen instructions to complete setup.
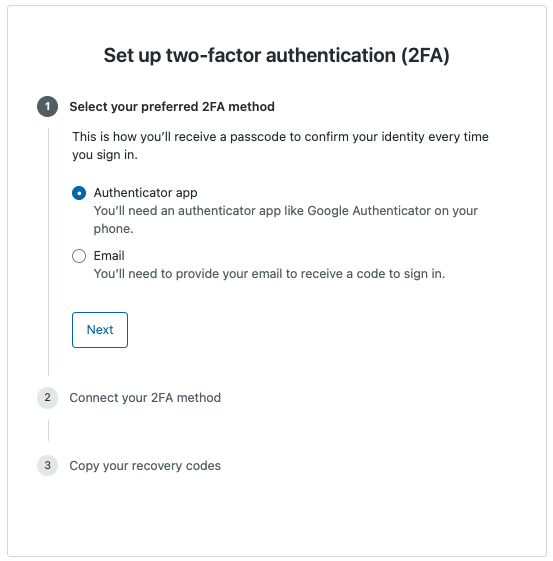
- Select the preferred method and follow the instructions on screen on how to set up that method.
Submit a new ticket
To create a new support request, click Submit a request. This opens a form where you can provide details about your question or issue.
In the Subject field, enter a brief summary of your request. In the Description field, provide detailed information. For example:
- Subject: How do I set encounter preferences?
-
Description: I’m trying to set encounter preferences for my billers, but I can’t find the encounter preferences section.
Attach supporting files by clicking Add File or dragging files into the upload area. Screenshots, invoices, or reports can help our team resolve your issue more efficiently.
Once all required fields are completed and attachments are added, click Submit.
After submission, the next screen will display your ticket details, where you can continue adding documentation if needed.
Already submitted an RXNT support ticket?
If you previously emailed RXNT Support, your email may already be on file with a partial setup. Click Emailed us for support? Get a Password to receive a password creation link.
View existing tickets
To view your tickets, click your name in the top-right corner of the Help Center and select My Activities.
You will see three tabs:
- Requests
- Contributions
- Following
Under Requests, there are three subtabs:
- My requests – Tickets you personally submitted
- Requests I’m CC’d on – Tickets where you were copied
- Organization requests – Tickets submitted by others in your organization
View my requests
Under Requests, you can view all the tickets you’ve submitted. Tickets display one of three statuses:
- Open – Being reviewed
- Awaiting Your Reply – RXNT needs additional information
- Solved – The issue has been resolved
Once RXNT provides a solution and no further action is needed, the ticket status will change to Solved.
View requests I'm CC'd on
This tab shows tickets where you were copied, allowing you to stay informed. You can filter by status:
- Open
- Awaiting Your Reply
- Solved
- Any
View organization requests
This tab displays tickets submitted by others in your organization that may not be linked directly to your email address. You can filter by the same status options for easier tracking.
Contributions
The Contributions tab displays any comments you have made on RXNT Help Center knowledge-base articles.
Following
The Following tab lists articles you have chosen to follow. You will receive updates whenever those articles are edited, helping you stay informed of changes or new guidance.
Reply to tickets
To view or respond to a ticket, click the Ticket Name in the Subject field. This opens the ticket and displays the full communication history between you and RXNT Support.
To reply, type your message in the response box, attach any necessary files, and click Submit. Your response will be added directly to the ticket for review by the support team.
Still, need help? Contact us!
Have a great idea? Tell us about it!