Add corporate users
Easily manage your corporate users through RXNT's corporate dashboard. After logging in, navigate to the Corporate Account icon and click Billing.
Click the Utilities icon.
Under User Management, click Corporate Users. Then, click New Corporate User to add a new user.
Enter the required information at the top of the screen, including Billing and Scheduling Roles, Username, Password, Confirm Password, First Name, Last Name, and Email.
Corporate Billing and Scheduler Dashboard Roles
- Corporate User: This role provides access to view the corporate dashboard and company users, as well as to generate various reports, including patient reports, miscellaneous reports, and revenue reports.
- Corporate Admin: This role provides permissions to access the corporate dashboard, create corporate users, assign companies to users, and view corporate roles.
- Corporate Admin / User: This role provides permissions to access the corporate dashboard, create corporate users, assign companies to users, view corporate roles, as well as to generate various reprots, including patient reports, miscellaneous reports, and revenue reprots.
At the bottom of the screen, click the green (+) to link specific doctor companies to the user. Then, choose the Doctor Company, Billing Role, and Scheduler Role from the dropdown menus.
Corporate Billing and Scheduler User Roles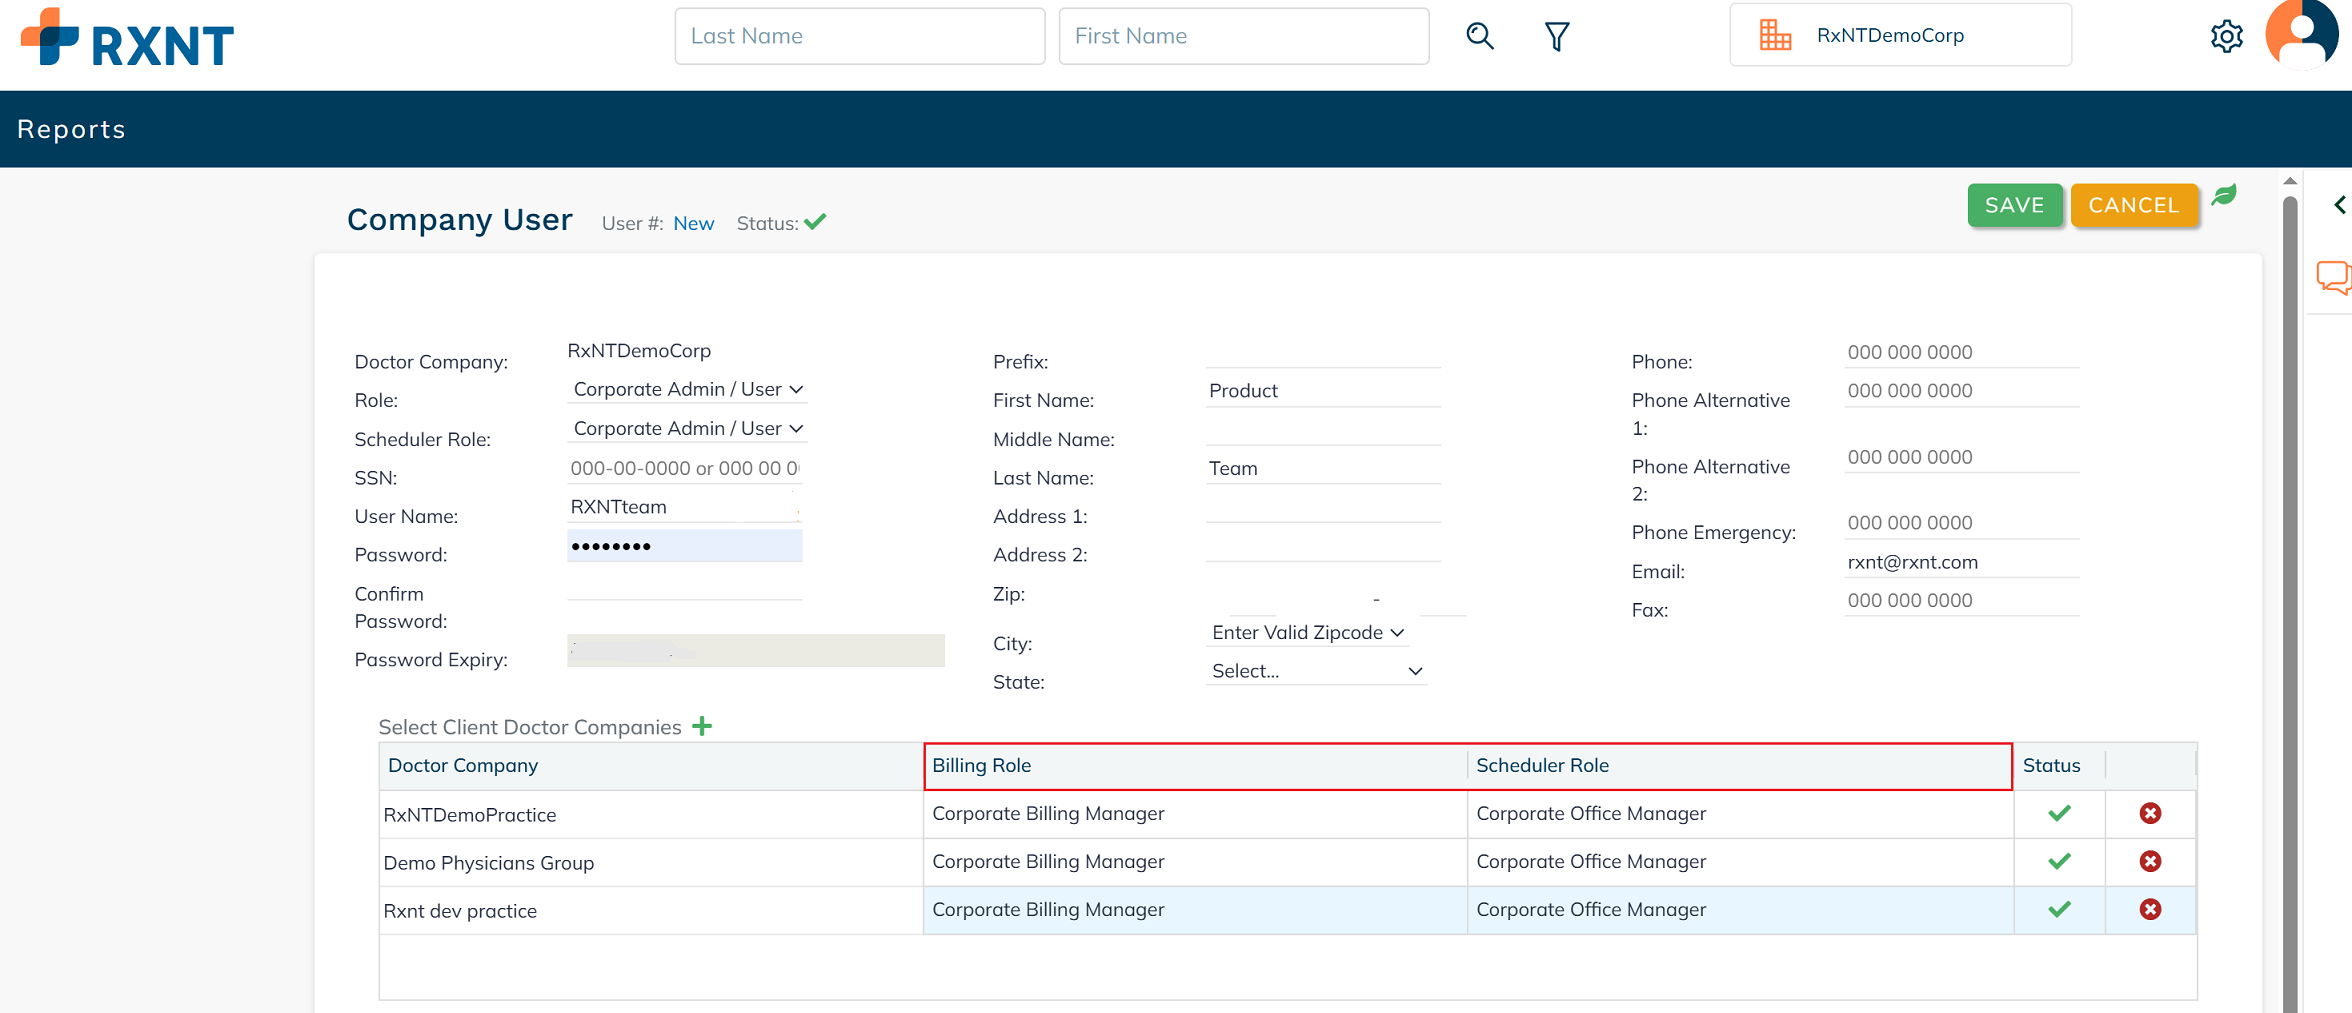
- Corporate Billing Manager: This role provides users with full access to a broad range of billing and administrative functions, including User Management, Practice Setup, Transactions, Provider Management, Custom Fields, Tools, Practice Management, Patient Records, Billing Charges, Claims, Payments, Dashboard, Denial Management, and File Uploads. It is intended for users who require comprehensive control over all billing-related processes and system configurations.
- Corporate Billing Associate: This role includes all permissions granted to the Billing Manager, except access to Custom Fields, Manage Practices, Preferences, Denial Managements, and Uploads. This role is designed for users who require access to essential billing and administrative functions, but do not need full system-wide permissions.
- Corporate Office Manager: This role provides users with full access to a comprehensive range of scheduling and administrative features, including User Management, Practice Setup, Provider Management, Company Master, Company Setup, Custom Fields, Patient Records, Appointment Calendar, Reports, Payments, Preferences, Patient Reminders, and Messaging. It is designed for users who require complete control over scheduler-related processes and configurations.
- Corporate Office Associate: This role includes all permissions granted to the Office Manager, excluding access to Manage Practices, Custom Fields, Patient Reminders, and Messages. This role is intended for users who require access to scheduling and administrative features without needing full system-wide permissions.
To remove a user's access to a specific company, click the red X icon.
After entering the appropriate information, click Save.
Access and edit corporate users
To access CBO's users, click the Utilities icon.
Under User Management, click Corporate Users.
To edit the user's information, click their name in the Full Name column.
Make the necessary edits, then click Save.
Assign practice admin role
The Practice Administrator role allows corporate users to manage specific client company accounts. This role must be assigned separately for each client company the corporate user needs access to.
Corporate users with the Practice Admin role can perform the following actions for the client company they're assigned to:
- Audit log
- Manage staff and locations
- Manage providers
- Send files to RXNT for import
- Manage logos
- Manage preferences
- Approve EPCS requests
To assign the Practice Admin role to a corporate user, access the Product Dashboard for the client company for which they need the role.
On the Product Dashboard, click the Utilities icon, then select Location and Staff Management.
Click the Users tab, then select the filter option in the upper right corner.
Check Include Corporate Users and enter any other search criteria. Then, click Search.
Locate the individual and click their name. Then click the three-dot menu and select Edit.
Select Practice Admin for the Dashboard Role, then click Save.
Still need help? Contact us!
Have a great idea? Tell us about it!